For me, one of the most fun things about going into one of those late night diners, is the sort of surreal food like “Day-Glo” red Strawberry Pie, made with fresh strawberries and some sort of unidentifiable pie filling “goo” that is super-sweet, and really, really, really red. Did you ever wonder what was in that stuff? Who cared???...it tasted great! Well, I decided I would delve into the “goo” and come up with a recipe that brings back all of the diner-like fun in your own kitchen—without the florescent lighting! And best of all: the ingredients include a package of strawberry gelatin! How much fun is that? A ton!!! Then, just to “up” the “stakes” on this winner of a dessert, I added fresh blueberries to it, and came up with a great “from scratch” pie crust recipe for this too!
NOTE: I am including a “really great” pie crust recipe here too. If you don’t want to bother with making your own pie crust: get thee to a grocery! Buy a pre-made pie crust in either the freezer department, or the refrigerated department, and prepare the pie crust according to the package directions.
Ingredients:
The Pie Crust:
—1 1/2 cups Flour
—1 tablepoon Sugar
—1/4 teaspoon Salt
—8 tablespoons Butter (one stick)
—4 to 6 tablespoons Water
The Pie Filling:
—1 three ounce package of powdered Strawberry Gelatin
—1 cup of Sugar
—6 tablespoons Corn Starch
—1 1/2 cups Water
The Fruit:
—6 cups (32 ounces in the carton) of sliced and washed fresh Strawberries
—2 cups (1 pint in the carton) of fresh Blueberries
Possibilities to Accompany:
—Whipped Cream
—Vanilla Ice Cream
Directions:
The Pie Crust:
Although making a pie crust from “scratch” seems like a nightmare, I have to say this particular recipe is easy to make, and yields a crust that really holds up well to this type of “fruit heavy” pie. When I first made and tweaked this crust, I was immediately impressed by the nice butter flavor, and the fact that it had minimal shrinkage in the baking process. Also, it is very sturdy crust, and every piece I sliced came out of the pie pan evenly without any crust breakage.
In a large mixing bowl add the flour, sugar, and salt. Cut up the butter into small pieces, and add to the flour, coating the butter bits with the flour. Add the first four tablespoons of water, and begin beating with a hand-held or stationary electric mixer. Keep running the butter chunks through the blades, incorporating the water. The desired outcome from this process is to end up with even textured kernels of flour and butter in the mixing bowl.
If you have too much flour, you can add up to two more tablespoons of water if you feel you need it. At a certain point, you just have to remove the mixer and get your hands in the dough, and kneed it by hand. As you do so, you will feel the butter melt and loosen up within the mixture. On a cutting board, or in the bowl, keep incorporating all of the flour. If you find the dough is too moist to work with, add more flour, approximately a tablespoon at a time.
Do not overwork the dough. When it is of a uniform and workable texture, flatten the ball of dough out and prepare to take a rolling pin to it. This process I prefer to do on the kitchen counter, on wax paper or parchment paper. This makes the rolled out dough very easy work with.
Using a rolling pin (or even an empty wine bottle!), roll out the dough in a big enough circle to accommodate your pie pan. I like to use a nine-and-a-half inch oven-proof glass pan for pies.
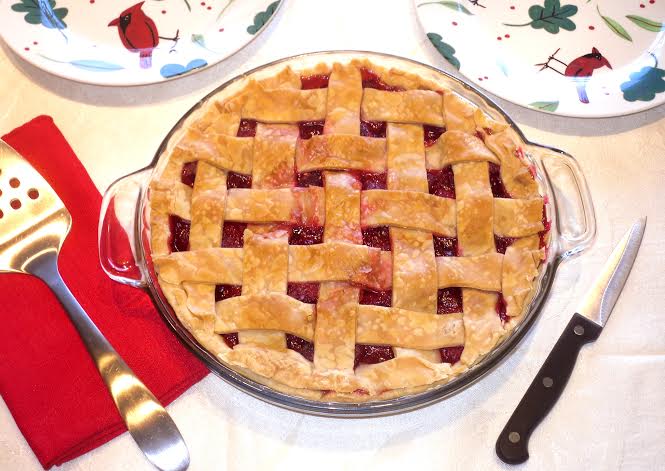
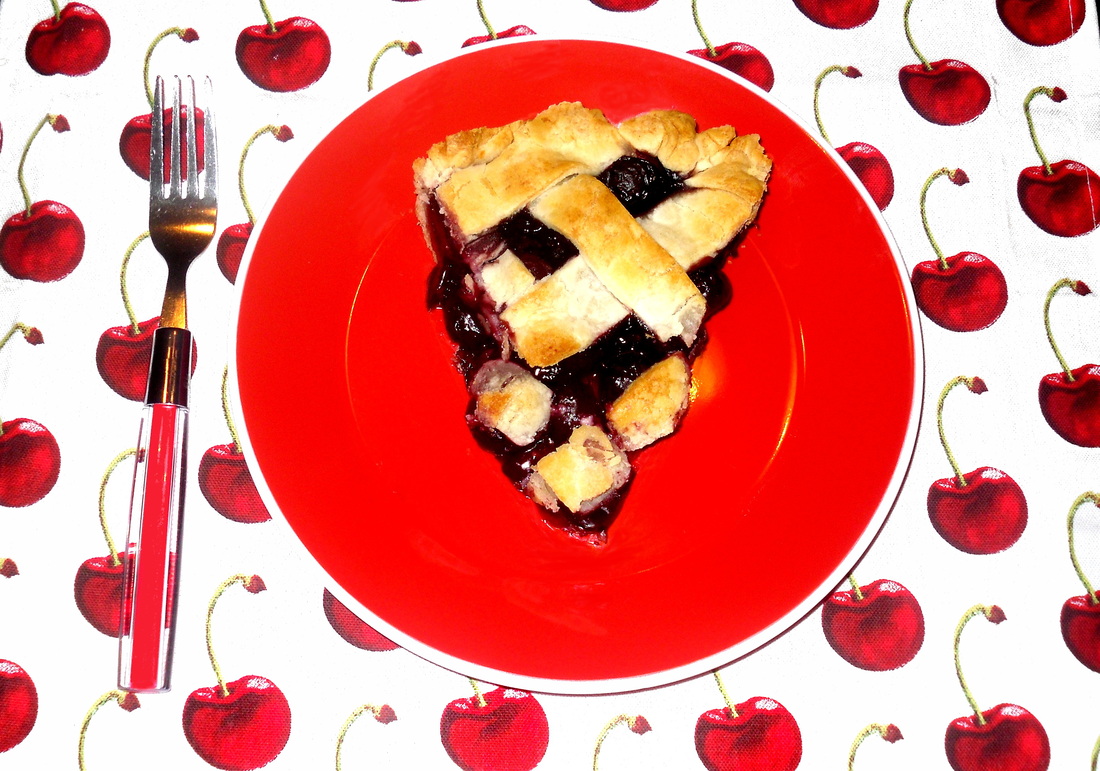
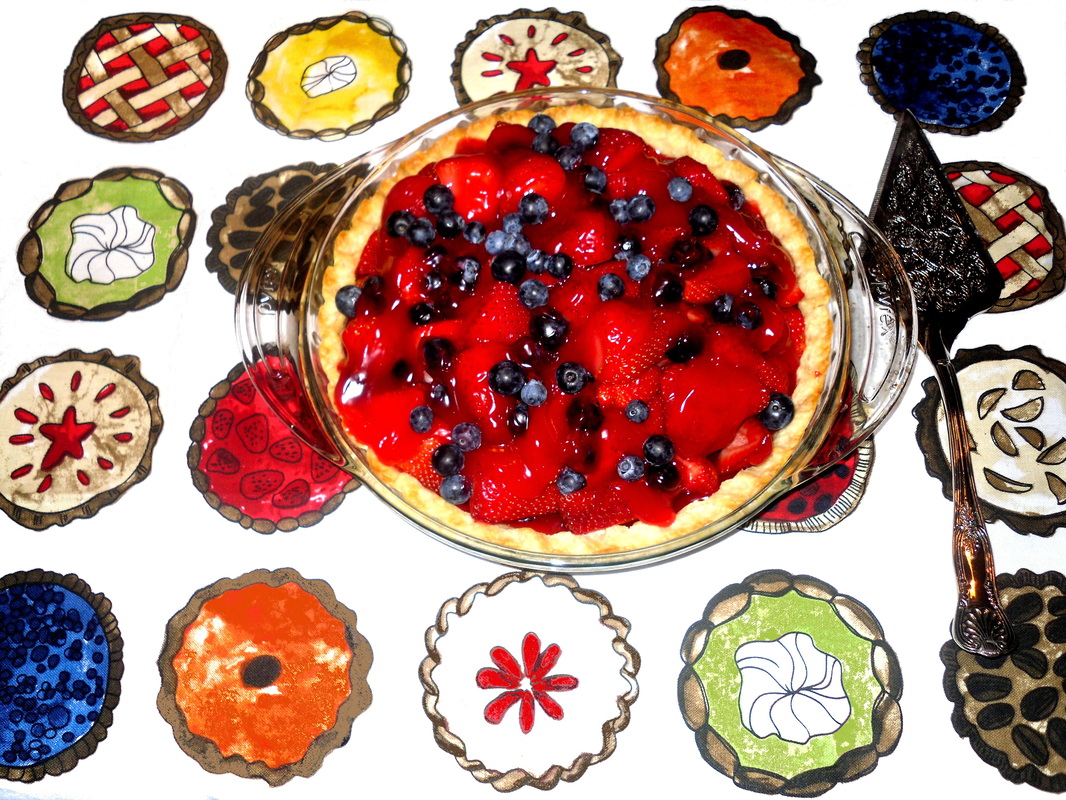
Utilizing the wax paper or parchment paper that you have rolled out the pie crust onto, flip it over, and position the upside-down pie crust into the pie pan of your choice. Peel off the wax or parchment paper. Pat down the crust at the interior corners, and either cut off or fold inward the excess pie crust dough. My method of making a “finished edge” pie crust is to take the thumb of one hand, and push a rounded thumbprint downward into the pinched thumb and forefinger of the other hand, one inch at a time all around the edge of the crust. What you will end up with (hopefully!) is an evenly zigzagging pattern all along the pie. (See my stunning crust in the photo!)
When you have the pie crust all even in shape and lovely looking, take a fork, and make little stab marks every inch or so across the bottom of the crust, and on the interior sides, below—but out of sight of—your beautifully formed pie crust edge. These fork pricks will help gas escape during the baking process, and keep the crust from bubbling up.
This is very important: Place your lovely unbaked pie crust in the refrigerator for at least 30 minutes to “set up.” With all of this butter in the crust, if you don’t do this, the warm butter in the dough will instantly melt in the oven, and sides of the crust will shrink and droop.
After 30 minutes, preheat the over for 450 degrees Fahrenheit. While it preheats, leave the pie crust in the refrigerator. When the oven reaches 450 degrees, take the pie pan out of the refrigerator and place it directly in the oven. Bake for 18 to 20 minutes. What you want to achieve is a light browning on the upper edges of the pie crust.
NOTE: If you have never heard of “pie weights,” here is the one time you would ever need such a crazy thing. However, as incredible as this pie crust is, while it bakes the flat base tends to rise off the center of the pie pan, like a balloon. Ceramic or steel pie weights eliminate this problem. The first time I made this crust, I had to open the oven door, reach in, and flatten out the center of the pie crust twice with a spatula before it would sit still. However, when it finally went down for the second time, the rest of the baking process was a breeze. The next time I used a chain of steel pie weights, and the bottom of the crust remained flat and uniform. During the last five minutes of baking, I removed the chain to brown under where the weights were. Now my unfilled pie crusts all came out perfectly!
The Fruit:
When the pie crust is baked, remove it from the oven, and allow it to cool off. While it does that, rinse and drain the blueberries and put them aside. Wash, remove the stem end of the strawberries and slice them.
The Pie Filling:
Now it is time to make the outrageously fun pie filling. In a small saucepan combine the powdered packet of strawberry gelatin, sugar, corn starch, and water. Using a wire whisk, vigorously stir out all of the lumps of corn starch, sugar and gelatin. It should be a lovely shade of red.
Place the sauce pan on the stove and heat to medium high. What you want to do is to achieve a full boil, while avoiding any burning at all. The best way to do this is to constantly stir the pan with a wire whisk, never stopping for a moment. As the mixture comes up to a boil, you will definitely feel the mixture start to cease up and thicken as the gelatin and sugar melts. This can take about 10 minutes. Once the mixture comes to a boil, continue stirring, and remove it from the heat. You will notice that in the last three minutes of this process, the liquid will go from an opaque dark pink, to a more vividly translucent red in color.
The Assembly:
So now you are going to have three completed elements before you: slightly cooler pie crust, cold and raw cut up berries, and hot sugary red pie filling. At this point you want to work pretty quickly. With the hot pie filling, you don’t want to cook the berries, however you do not want the pie filling to cool down and “set up.”
Using a spoon, add enough of the pie filling to the baked pie crust to spread onto the bottom of the crust, especially making sure to smear it into the edge where the bottom of the crust meets the side. After you have smoothed out this layer, sprinkle a layer of two-thirds of the blueberries on the bottom of the pie to cover the whole bottom. (This layer of blueberries, with their skins 100% intact, and the gel-like pie filling, are going to make a layer on the bottom that is going to prevent slices of wet strawberry from laying on the pie crust and making it wet and mushy! Clever hmmm?)
On top of the blueberry bottom layer, add a generous layer of sliced strawberries. Using a spoon or an icing knife, add a layer of the pie filling to adhere all of the strawberries to each other.
NOTE: The thick and hot pie filling will ooze downward to fill in the gaps in the fruit as you continue.
Next, add another layer of strawberries, causing them to mound up in the center. I like to place all of the strawberries in by hand—especially at this point—as you want nothing showing but the strawberries with their speckled skins upward, and their sliced sides downward. When you have arranged the top layer of strawberries in place, dribble, spread or smear the rest of the pie filling in place atop the pie. With the final—approximately half a cup of blueberries, arrange them decoratively atop the pie, using them to fill in holes and gaps, and for decoration. Make sure they are glued in place with strawberry pie filling.
When the pie is to your liking visually, place it in the refrigerator for at least two hours to solidify, and get it cold all the way in the middle. When you serve this pie, with its outlandishly strawberry red look, its beautifully browned buttery hand-made crust, and its blueberries carefully placed onto the top like confetti: this pie is irresistible. Welcome to: Mark’s Diner!
NOTE: I am including a “really great” pie crust recipe here too. If you don’t want to bother with making your own pie crust: get thee to a grocery! Buy a pre-made pie crust in either the freezer department, or the refrigerated department, and prepare the pie crust according to the package directions.
Ingredients:
The Pie Crust:
—1 1/2 cups Flour
—1 tablepoon Sugar
—1/4 teaspoon Salt
—8 tablespoons Butter (one stick)
—4 to 6 tablespoons Water
The Pie Filling:
—1 three ounce package of powdered Strawberry Gelatin
—1 cup of Sugar
—6 tablespoons Corn Starch
—1 1/2 cups Water
The Fruit:
—6 cups (32 ounces in the carton) of sliced and washed fresh Strawberries
—2 cups (1 pint in the carton) of fresh Blueberries
Possibilities to Accompany:
—Whipped Cream
—Vanilla Ice Cream
Directions:
The Pie Crust:
Although making a pie crust from “scratch” seems like a nightmare, I have to say this particular recipe is easy to make, and yields a crust that really holds up well to this type of “fruit heavy” pie. When I first made and tweaked this crust, I was immediately impressed by the nice butter flavor, and the fact that it had minimal shrinkage in the baking process. Also, it is very sturdy crust, and every piece I sliced came out of the pie pan evenly without any crust breakage.
In a large mixing bowl add the flour, sugar, and salt. Cut up the butter into small pieces, and add to the flour, coating the butter bits with the flour. Add the first four tablespoons of water, and begin beating with a hand-held or stationary electric mixer. Keep running the butter chunks through the blades, incorporating the water. The desired outcome from this process is to end up with even textured kernels of flour and butter in the mixing bowl.
If you have too much flour, you can add up to two more tablespoons of water if you feel you need it. At a certain point, you just have to remove the mixer and get your hands in the dough, and kneed it by hand. As you do so, you will feel the butter melt and loosen up within the mixture. On a cutting board, or in the bowl, keep incorporating all of the flour. If you find the dough is too moist to work with, add more flour, approximately a tablespoon at a time.
Do not overwork the dough. When it is of a uniform and workable texture, flatten the ball of dough out and prepare to take a rolling pin to it. This process I prefer to do on the kitchen counter, on wax paper or parchment paper. This makes the rolled out dough very easy work with.
Using a rolling pin (or even an empty wine bottle!), roll out the dough in a big enough circle to accommodate your pie pan. I like to use a nine-and-a-half inch oven-proof glass pan for pies.
Utilizing the wax paper or parchment paper that you have rolled out the pie crust onto, flip it over, and position the upside-down pie crust into the pie pan of your choice. Peel off the wax or parchment paper. Pat down the crust at the interior corners, and either cut off or fold inward the excess pie crust dough. My method of making a “finished edge” pie crust is to take the thumb of one hand, and push a rounded thumbprint downward into the pinched thumb and forefinger of the other hand, one inch at a time all around the edge of the crust. What you will end up with (hopefully!) is an evenly zigzagging pattern all along the pie. (See my stunning crust in the photo!)
When you have the pie crust all even in shape and lovely looking, take a fork, and make little stab marks every inch or so across the bottom of the crust, and on the interior sides, below—but out of sight of—your beautifully formed pie crust edge. These fork pricks will help gas escape during the baking process, and keep the crust from bubbling up.
This is very important: Place your lovely unbaked pie crust in the refrigerator for at least 30 minutes to “set up.” With all of this butter in the crust, if you don’t do this, the warm butter in the dough will instantly melt in the oven, and sides of the crust will shrink and droop.
After 30 minutes, preheat the over for 450 degrees Fahrenheit. While it preheats, leave the pie crust in the refrigerator. When the oven reaches 450 degrees, take the pie pan out of the refrigerator and place it directly in the oven. Bake for 18 to 20 minutes. What you want to achieve is a light browning on the upper edges of the pie crust.
NOTE: If you have never heard of “pie weights,” here is the one time you would ever need such a crazy thing. However, as incredible as this pie crust is, while it bakes the flat base tends to rise off the center of the pie pan, like a balloon. Ceramic or steel pie weights eliminate this problem. The first time I made this crust, I had to open the oven door, reach in, and flatten out the center of the pie crust twice with a spatula before it would sit still. However, when it finally went down for the second time, the rest of the baking process was a breeze. The next time I used a chain of steel pie weights, and the bottom of the crust remained flat and uniform. During the last five minutes of baking, I removed the chain to brown under where the weights were. Now my unfilled pie crusts all came out perfectly!
The Fruit:
When the pie crust is baked, remove it from the oven, and allow it to cool off. While it does that, rinse and drain the blueberries and put them aside. Wash, remove the stem end of the strawberries and slice them.
The Pie Filling:
Now it is time to make the outrageously fun pie filling. In a small saucepan combine the powdered packet of strawberry gelatin, sugar, corn starch, and water. Using a wire whisk, vigorously stir out all of the lumps of corn starch, sugar and gelatin. It should be a lovely shade of red.
Place the sauce pan on the stove and heat to medium high. What you want to do is to achieve a full boil, while avoiding any burning at all. The best way to do this is to constantly stir the pan with a wire whisk, never stopping for a moment. As the mixture comes up to a boil, you will definitely feel the mixture start to cease up and thicken as the gelatin and sugar melts. This can take about 10 minutes. Once the mixture comes to a boil, continue stirring, and remove it from the heat. You will notice that in the last three minutes of this process, the liquid will go from an opaque dark pink, to a more vividly translucent red in color.
The Assembly:
So now you are going to have three completed elements before you: slightly cooler pie crust, cold and raw cut up berries, and hot sugary red pie filling. At this point you want to work pretty quickly. With the hot pie filling, you don’t want to cook the berries, however you do not want the pie filling to cool down and “set up.”
Using a spoon, add enough of the pie filling to the baked pie crust to spread onto the bottom of the crust, especially making sure to smear it into the edge where the bottom of the crust meets the side. After you have smoothed out this layer, sprinkle a layer of two-thirds of the blueberries on the bottom of the pie to cover the whole bottom. (This layer of blueberries, with their skins 100% intact, and the gel-like pie filling, are going to make a layer on the bottom that is going to prevent slices of wet strawberry from laying on the pie crust and making it wet and mushy! Clever hmmm?)
On top of the blueberry bottom layer, add a generous layer of sliced strawberries. Using a spoon or an icing knife, add a layer of the pie filling to adhere all of the strawberries to each other.
NOTE: The thick and hot pie filling will ooze downward to fill in the gaps in the fruit as you continue.
Next, add another layer of strawberries, causing them to mound up in the center. I like to place all of the strawberries in by hand—especially at this point—as you want nothing showing but the strawberries with their speckled skins upward, and their sliced sides downward. When you have arranged the top layer of strawberries in place, dribble, spread or smear the rest of the pie filling in place atop the pie. With the final—approximately half a cup of blueberries, arrange them decoratively atop the pie, using them to fill in holes and gaps, and for decoration. Make sure they are glued in place with strawberry pie filling.
When the pie is to your liking visually, place it in the refrigerator for at least two hours to solidify, and get it cold all the way in the middle. When you serve this pie, with its outlandishly strawberry red look, its beautifully browned buttery hand-made crust, and its blueberries carefully placed onto the top like confetti: this pie is irresistible. Welcome to: Mark’s Diner!