These colorful, exotic, and mesmerizing cookies are all the rage in the culinary world. When it comes to Macarons, the wilder and more dramatic the flavors and the brighter the hues, all the better! In gourmet shops they sell for a shocking $2.50 or more PER COOKIE. There is a very logical reason they are so amazing and expensive: making them yourself is a time consuming and daunting task. However, when you get the formula right: Oooh la la! Fantastique!
Meringue: So delicate, so elegant, and so damn temperamental! Underbeat the eggs: the cookie runs. Overbeat the eggs: they come out of the piping bag looking like a caveman made them.
I know you are asking yourself: “If they are so difficult to make, why bother to tackle this project?” It is part of that ages old struggle of “man versus meringue!” When you get it right, you feel like a total kitchen rock star!
And, I bet you thought Macarons were those yummy coconut haystack cookies. Well, those are “macaroons” with two “o’s.” These are French Macarons with one “o,” and they are made with ground almond flour and powdered sugar folded into meringue.
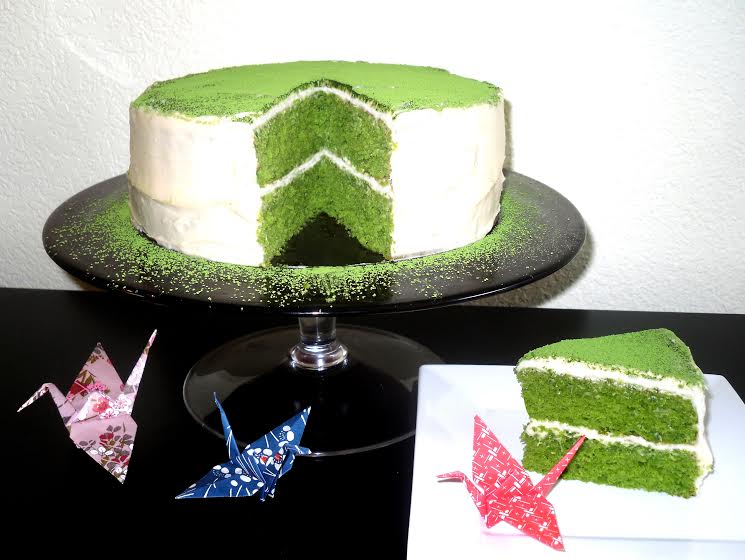
The first time I made Macarons, I was with my niece Heather, and we made Green Tea Macarons. We made them with Japanese “Matcha,” powdered green tea, and the centers were matcha butter cream frosting. The second time we got together I made them in Orange and Blueberry, and although the tops were smooth, the batter was thin and the cookies ran together. When Heather arrived that afternoon we upped the egg-beating time, and ended up with two great batches in Key Lime and Passion Fruit.
When I got back to Arizona, to my own kitchen, I set about making five batches in separate flavors and colors: back-to-back. This time I refined the recipe and it totally worked. The cookies were beautiful, and they were incredibly delicious with well formed and smooth tops.
Successfully making and filling these cookies is a task that takes time, and a lot of patience. To create the five flavors that I made, I kept the filling’s pre-made and in jars. Lemon and Lime Curd is easy to make, however the pre-made curds that come in a jar as pie filling or as a bread or muffin spread, are perfect for the Watermelon Lemonade and Key Lime Macarons. And, the other three fillings: Blueberry Preserves, Orange Marmalade, and Apricot Preserves (with added Passion Fruit flavoring), are the perfect match for the corresponding cookies: Blueberry Macarons, Orange Macarons, and Passion Fruit Macarons.
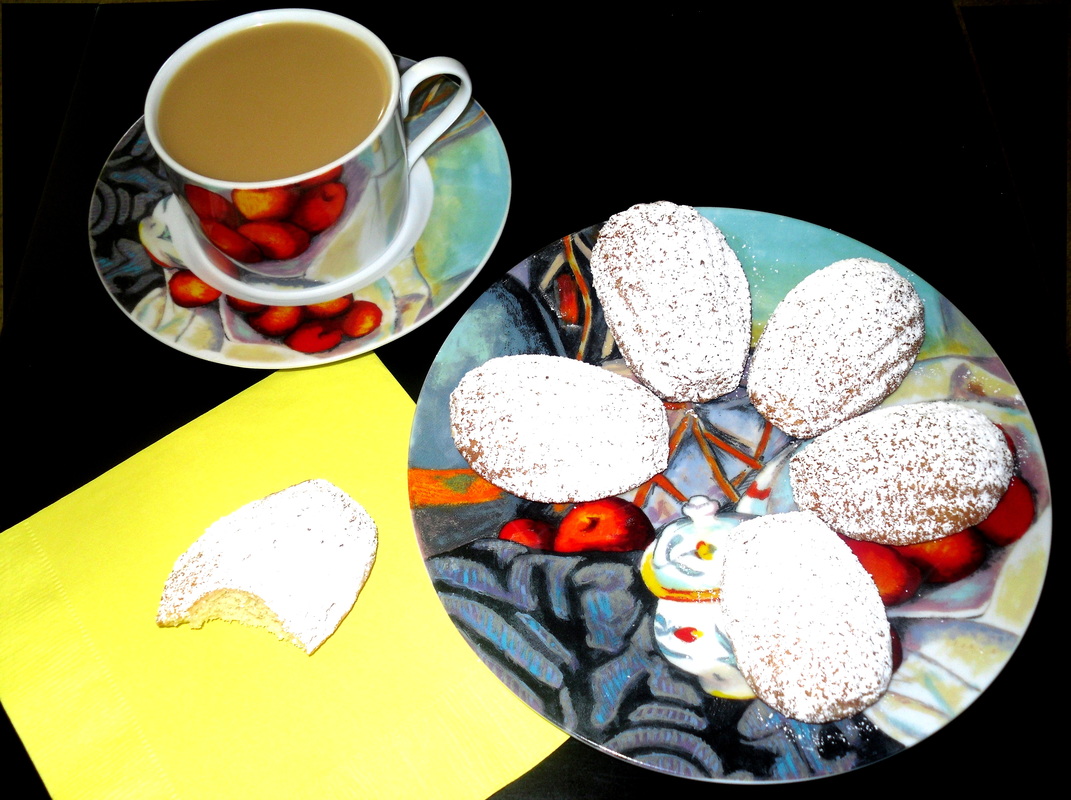
As you can see from the rainbow of Macarons in this photo, the third time IS the charm! I nailed this recipe, and ended up with over 100 cookies. They remain good for a week in zippered food storage bags either refrigerated or not, so they can easily be made a day ahead of a party.
When following this recipe, please note that meringue is sensitive, and the cooking and beating times can vary slightly due to elevation and humidity. Although I am going to give you the beating and baking times that worked for me, you might have to make adjustments for your own exact oven temperature.
French Macarons
Ingredients:
—1/2 cup Egg Whites (the whites from 4 large eggs)
—1 3/4 cups Powdered Sugar (Confectioner’s Sugar)
—1/4 teaspoon Cream of Tartar Powder
—1 cup Almond Flour
—1/4 cup Granulated Sugar
—1/4 teaspoon Flavoring: Extract or Oil*
—2 to 3 drops liquid or gel Food Coloring
* For these five varieties: Blueberry Flavoring, Orange Extract, Passion Fruit Extract, Lime Oil, and Watermelon Flavoring
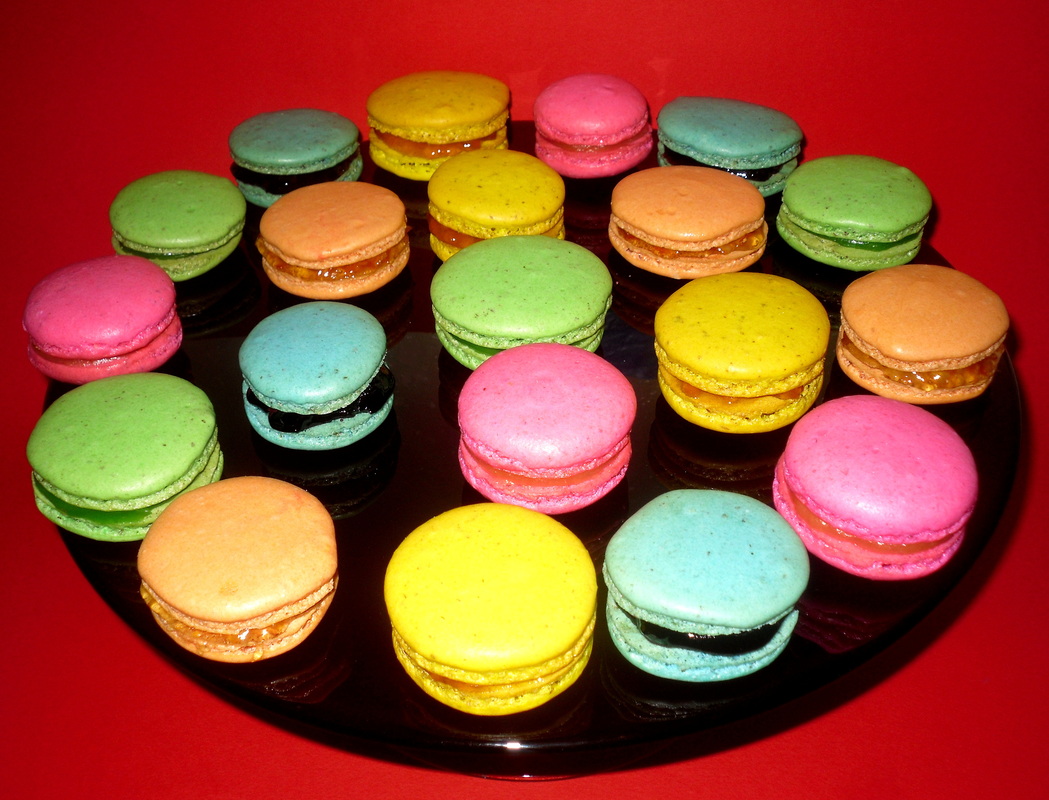
Color suggestions as per photo: blue = blueberry, orange = orange (one drop yellow and one drop of red, mixed together), yellow = passion fruit, green = lime, pink = watermelon.
NOTE: These measurements of ingredients are per batch.
One or more of the following fillings:
—Blueberry Preserves for the Blueberry Macarons
—Orange Marmalade for the Orange Macarons
—Apricot Preserves for the Passion Fruit Macarons
—Lime Curd for the Key Lime Macarons
—Lemon Curd for the Watermelon Lemonade Macarons
* Most grocery stores have extracts and flavoring oils. For more exotic ones, go to your local cooking supply store, or gourmet store. The sky is really the limit on the flavors you can come up with. With regard to “liquid vs. gel coloring,” I found that it is really a draw. If there is a very specific color you want, like deep purple, hot pink, or tangerine orange, I would recommend pre-made gel color, because you don’t want to stir the batter too many times playing with blending colors.
Directions:
Before you start mixing batter, you need to cut a piece of baker’s parchment paper that will exactly fit your large flat baking sheet pan. On the back of the paper, in pencil trace the size of cookies you would like to make. The tracing on the back of the paper will help you make uniform sized cookies. Since you will be matching up top and bottoms of these filled cookies, you want size uniformity.
NOTE: I discovered that a normal round bartending shot glass is the perfect diameter to trace around for perfectly round circles on the parchment paper. (And I just happened to have several of them at hand at all times!) Also, use pencil not ink. And make sure you bake on the un-written upon side. Pencil side down!!!
When you have the parchment paper traced with your cookie forms, turn it over, and affix it in the four corners with either a dot of corn syrup, or maple syrup, or some other sort of edible glue that can go into the oven and be washed off later.
NOTE: I was able to fit 24 individual cookies on one large cookie sheet, and 18 on another, making for 42 individual cookies per batch. With tops and bottoms assembled, that made 21 finished Macarons per batch.
Now it is time to make the batter. In a mixing bowl add the powdered (confectioner’s) sugar, and the almond flour, and combine them with a spoon or whisk. [Before you add the almond flour, it is recommended that you put it through a flour sifter, to make sure there aren’t any lumps.]
In another mixing bowl place the 1/2 cup of egg whites, and the cream of tartar. Beat the egg whites with a handheld electric or standing electric mixer, until stiff peaks form when you lift the stationary beaters upward. Set the beater speed for 3/4’s of the way to High on the setting dial or lever. Beat the egg whites and cream of tartar for four minutes. After four minutes, while continually beating, gradually add the 1/4 cup of granulated sugar, continuing to beat for a full five more minutes. In other words, you beat these egg whites into total submission for a full unresting 10 minutes. At this point, the egg whites should be frothy, silky and stiff.
Add the powdered sugar and almond flour mixture to the beaten egg whites, and gently fold it into the eggs. When the consistency is becoming uniform, add the desired flavoring and food coloring. I found that 1/2 of a teaspoon of flavoring does the trick for this recipe. Add two or three drops of liquid food coloring or gel food coloring. Fold those into the batter until the color is intense and even. These are supposed to be exciting cookies, make them colorfully exciting to the eyes!
NOTE: “Folding” is done by hand with a spatula. It involves dragging the spatula along the bottom of the bowl and drawing it upward through and into the top layer of almond flour and powdered sugar. Then you turn the bowl 45 degrees, and repeat the process, always drawing upward from the bottom—no downward strokes of you break the air bubbles in the egg whites. Do not over-fold the batter, or the cookies will crack on top when they bake. (If you end up with cracked tops, beat the next batch less, and let them dry longer before baking.) When folding ingredients upward, the goal in this recipe is to try and limit yourself to no more than 18 folds—including the coloring and flavoring—or you will overwork the delicate batter.
Snip the very end off one 1-gallon re-sealable food storage or piping bag, and insert and tightly fit a one-quarter-inch to one-half-inch piping bag nozzle in the end. (The nozzle is not mandatory, but it sure makes for more uniform piping of batter!) Fill the piping bag with the batter, close the zipper seal, and force the batter down to the open piping bag tip you have in place.
OK…here is the part that takes the most concentration: Pipe the cookie batter into concentric discs evenly and equally onto the parchment paper. Regulate the flow of the cookie batter by squeezing the bag and forcing the batter out the nozzle in an even flow.
Ideally, the consistency of the batter will flow and run just slightly. You should be able to point the nozzle in the middle of your sketched circle, and just squeeze it out concentrically from one single point, making the batter flow out evenly in every direction.
As you complete each cookie, let up on the pressure to the piping bag and quickly move on to the next cookie. Repeat as evenly and uniformly as possible, continually forming the cookies, and moving onto the next.
The batter should flow evenly and form perfectly flat-topped cookies. Basically, the shape you get from the piping, is the shape you will get in the finished cookie. If you need to take a butter knife or a thin frosting spatula to even them out, this is your one chance to do this. However, be very careful if you touch them in any way before baking.
Obviously, you will need 24 individual cookie halves to yield a batch of 12 finished macarons. The yield actually depends on what the size you pipe the cookies. I feel that cookies with a two inch diameter bake to become an easy size to work with.
One trick to eliminating any bubbles in the batter, and to even out the tops of the batter, is to raise the baking pan upward six inches, and drop it squarely and flatly onto your kitchen counter or table. You can repeat this process up to three times. You will see any large bubbles pop on the surface of the cookies, and the tops will now be flatter and smoother.
Although it seems extreme (and slightly boring), you must now let the raw cookies to sit for (at least) a full 30 minutes, or until the tops of the cookies can be gently touched without your fingers sticking. If you are doing more than one batch or flavor, use this time to clean up the mixing bowls, and prepare to get the next batch ready.
NOTE: Adjust your oven rack to the middle-to-upper third of the oven so that the bottoms don’t burn.
Preheat the oven to 300 degrees Fahrenheit, insert the cookies and bake for 20 minutes. If at any point you want to peek into the oven to observe baking progress, you can do so, but do not slam the oven door shut. As you approach 20 minutes of oven time you should see the rounded tops of the cookies successfully breaking away from the base of the cookie, forming the trademark upward neck of stretch lines as they rise. Make sure they get the full 20 minutes in the oven, or the middles could be damp and stick to the parchment paper.
Remove the cookies from the oven, and let them cool. If you have multiple pans, you can now place the next prepared pan in the oven while “batch one” cools off. Once the baked cookies have cooled, the cookie tops and bottoms should easily peel away from the parchment paper. Place the individual cookie halves on a plate or a piece of wax paper.
Now it is time to apply the centers to the flat side of the cookies you determine to be the bottoms, and assemble them into finished Macarons. Since these are handmade cookies, there will undoubtedly be some size variations. Now is the perfect time to match up the most identically sized halves. If you are going to display these on a serving plate, you will probably want the cookies with the flattest bottoms to be the bottom of this sandwich cookie. Also, you will probably want to designate your most attractive and perfectly formed halves as the ones that are displayed as the tops.
For preserve-filled cookies, like the Orange and Blueberry, remove one half a cup of preserve from the jar, place in a bowl, and stir it up. It will spread more easily this way. For the passion fruit, place one half cup of apricot preserves in a bowl, and mix in 1/4 to 1/2 a teaspoon of Passion Fruit extract. For the Key Lime Macaron filling, place one half cup of lime curd in a bowl, add a drop or two of green food coloring, and mix (lime marmalade will also work great as a filling in this macaron). For the Watermelon Lemonade Macaron filling, take one half cup of lemon curd, and stir it in a bowl. Approximately one teaspoon of preserve or curd should do the trick per cookie. Spread it onto the bottom of one of the cookie halves with a butter knife or frosting spatula, and affix an equal sized top cookie on it. If you give it a clockwise or counter-clockwise twist, the cookie tops and bottoms will lock onto each other. When you are finished, they should resemble colorful little “hamburgers.”
Repeat the process until all of the cookies are complete. Now, that was easy wasn’t it? Even if your cookies don’t come out perfect looking the first time around, they are none-the-less delicious, and will be the hit of any dessert table at which you serve them. This is one of those recipes where it may take you a couple of batches to get it right, but it is so worth it!
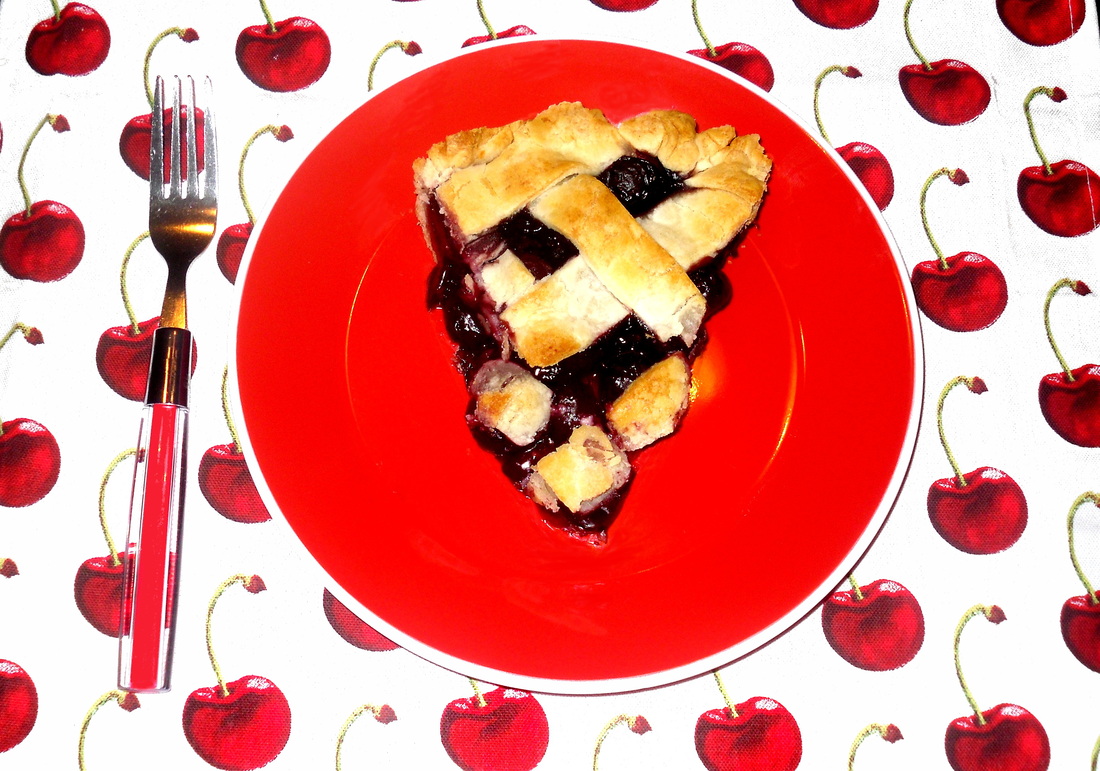
In case you really want to go wild: here are some more suggested flavors: Lavender Macarons (lavender extract, purple food coloring, fill with cream cheese frosting), Chocolate Mint Macarons (green food coloring, mint flavoring, chocolate spread centers), Cherry Macarons (red food coloring, cherry flavoring, cherry preserve filling), Raspberry / Blackberry Macarons (deep purple food coloring, raspberry flavoring, blackberry preserve filling), Pineapple Macarons (yellow food coloring, pineapple flavoring, pineapple preserve filling), and Licorice Macarons (black food coloring, anise or licorice flavoring, anise or licorice flavored black or white cream cheese frosting).
NOTE: for Cream Cheese Frosting: with a hand or stationary electric mixer, blend together 8 oz. Cream Cheese (room temperature), 1/2 cup (one stick) Butter (room temperature), 1 pound of Powdered (confectioners) Sugar. Mix until thick and creamy. Flavor with six teaspoons pure vanilla extract for intense vanilla frosting. Other flavors and colors are up to you.
I realize that these are time-consuming cookies to make, however, when you stand back and look at the finished product, you will be amazed. If you are looking for a dramatic dessert that will amaze your family and friends, this is it!
Meringue: So delicate, so elegant, and so damn temperamental! Underbeat the eggs: the cookie runs. Overbeat the eggs: they come out of the piping bag looking like a caveman made them.
I know you are asking yourself: “If they are so difficult to make, why bother to tackle this project?” It is part of that ages old struggle of “man versus meringue!” When you get it right, you feel like a total kitchen rock star!
And, I bet you thought Macarons were those yummy coconut haystack cookies. Well, those are “macaroons” with two “o’s.” These are French Macarons with one “o,” and they are made with ground almond flour and powdered sugar folded into meringue.
The first time I made Macarons, I was with my niece Heather, and we made Green Tea Macarons. We made them with Japanese “Matcha,” powdered green tea, and the centers were matcha butter cream frosting. The second time we got together I made them in Orange and Blueberry, and although the tops were smooth, the batter was thin and the cookies ran together. When Heather arrived that afternoon we upped the egg-beating time, and ended up with two great batches in Key Lime and Passion Fruit.
When I got back to Arizona, to my own kitchen, I set about making five batches in separate flavors and colors: back-to-back. This time I refined the recipe and it totally worked. The cookies were beautiful, and they were incredibly delicious with well formed and smooth tops.
Successfully making and filling these cookies is a task that takes time, and a lot of patience. To create the five flavors that I made, I kept the filling’s pre-made and in jars. Lemon and Lime Curd is easy to make, however the pre-made curds that come in a jar as pie filling or as a bread or muffin spread, are perfect for the Watermelon Lemonade and Key Lime Macarons. And, the other three fillings: Blueberry Preserves, Orange Marmalade, and Apricot Preserves (with added Passion Fruit flavoring), are the perfect match for the corresponding cookies: Blueberry Macarons, Orange Macarons, and Passion Fruit Macarons.
As you can see from the rainbow of Macarons in this photo, the third time IS the charm! I nailed this recipe, and ended up with over 100 cookies. They remain good for a week in zippered food storage bags either refrigerated or not, so they can easily be made a day ahead of a party.
When following this recipe, please note that meringue is sensitive, and the cooking and beating times can vary slightly due to elevation and humidity. Although I am going to give you the beating and baking times that worked for me, you might have to make adjustments for your own exact oven temperature.
French Macarons
Ingredients:
—1/2 cup Egg Whites (the whites from 4 large eggs)
—1 3/4 cups Powdered Sugar (Confectioner’s Sugar)
—1/4 teaspoon Cream of Tartar Powder
—1 cup Almond Flour
—1/4 cup Granulated Sugar
—1/4 teaspoon Flavoring: Extract or Oil*
—2 to 3 drops liquid or gel Food Coloring
* For these five varieties: Blueberry Flavoring, Orange Extract, Passion Fruit Extract, Lime Oil, and Watermelon Flavoring
Color suggestions as per photo: blue = blueberry, orange = orange (one drop yellow and one drop of red, mixed together), yellow = passion fruit, green = lime, pink = watermelon.
NOTE: These measurements of ingredients are per batch.
One or more of the following fillings:
—Blueberry Preserves for the Blueberry Macarons
—Orange Marmalade for the Orange Macarons
—Apricot Preserves for the Passion Fruit Macarons
—Lime Curd for the Key Lime Macarons
—Lemon Curd for the Watermelon Lemonade Macarons
* Most grocery stores have extracts and flavoring oils. For more exotic ones, go to your local cooking supply store, or gourmet store. The sky is really the limit on the flavors you can come up with. With regard to “liquid vs. gel coloring,” I found that it is really a draw. If there is a very specific color you want, like deep purple, hot pink, or tangerine orange, I would recommend pre-made gel color, because you don’t want to stir the batter too many times playing with blending colors.
Directions:
Before you start mixing batter, you need to cut a piece of baker’s parchment paper that will exactly fit your large flat baking sheet pan. On the back of the paper, in pencil trace the size of cookies you would like to make. The tracing on the back of the paper will help you make uniform sized cookies. Since you will be matching up top and bottoms of these filled cookies, you want size uniformity.
NOTE: I discovered that a normal round bartending shot glass is the perfect diameter to trace around for perfectly round circles on the parchment paper. (And I just happened to have several of them at hand at all times!) Also, use pencil not ink. And make sure you bake on the un-written upon side. Pencil side down!!!
When you have the parchment paper traced with your cookie forms, turn it over, and affix it in the four corners with either a dot of corn syrup, or maple syrup, or some other sort of edible glue that can go into the oven and be washed off later.
NOTE: I was able to fit 24 individual cookies on one large cookie sheet, and 18 on another, making for 42 individual cookies per batch. With tops and bottoms assembled, that made 21 finished Macarons per batch.
Now it is time to make the batter. In a mixing bowl add the powdered (confectioner’s) sugar, and the almond flour, and combine them with a spoon or whisk. [Before you add the almond flour, it is recommended that you put it through a flour sifter, to make sure there aren’t any lumps.]
In another mixing bowl place the 1/2 cup of egg whites, and the cream of tartar. Beat the egg whites with a handheld electric or standing electric mixer, until stiff peaks form when you lift the stationary beaters upward. Set the beater speed for 3/4’s of the way to High on the setting dial or lever. Beat the egg whites and cream of tartar for four minutes. After four minutes, while continually beating, gradually add the 1/4 cup of granulated sugar, continuing to beat for a full five more minutes. In other words, you beat these egg whites into total submission for a full unresting 10 minutes. At this point, the egg whites should be frothy, silky and stiff.
Add the powdered sugar and almond flour mixture to the beaten egg whites, and gently fold it into the eggs. When the consistency is becoming uniform, add the desired flavoring and food coloring. I found that 1/2 of a teaspoon of flavoring does the trick for this recipe. Add two or three drops of liquid food coloring or gel food coloring. Fold those into the batter until the color is intense and even. These are supposed to be exciting cookies, make them colorfully exciting to the eyes!
NOTE: “Folding” is done by hand with a spatula. It involves dragging the spatula along the bottom of the bowl and drawing it upward through and into the top layer of almond flour and powdered sugar. Then you turn the bowl 45 degrees, and repeat the process, always drawing upward from the bottom—no downward strokes of you break the air bubbles in the egg whites. Do not over-fold the batter, or the cookies will crack on top when they bake. (If you end up with cracked tops, beat the next batch less, and let them dry longer before baking.) When folding ingredients upward, the goal in this recipe is to try and limit yourself to no more than 18 folds—including the coloring and flavoring—or you will overwork the delicate batter.
Snip the very end off one 1-gallon re-sealable food storage or piping bag, and insert and tightly fit a one-quarter-inch to one-half-inch piping bag nozzle in the end. (The nozzle is not mandatory, but it sure makes for more uniform piping of batter!) Fill the piping bag with the batter, close the zipper seal, and force the batter down to the open piping bag tip you have in place.
OK…here is the part that takes the most concentration: Pipe the cookie batter into concentric discs evenly and equally onto the parchment paper. Regulate the flow of the cookie batter by squeezing the bag and forcing the batter out the nozzle in an even flow.
Ideally, the consistency of the batter will flow and run just slightly. You should be able to point the nozzle in the middle of your sketched circle, and just squeeze it out concentrically from one single point, making the batter flow out evenly in every direction.
As you complete each cookie, let up on the pressure to the piping bag and quickly move on to the next cookie. Repeat as evenly and uniformly as possible, continually forming the cookies, and moving onto the next.
The batter should flow evenly and form perfectly flat-topped cookies. Basically, the shape you get from the piping, is the shape you will get in the finished cookie. If you need to take a butter knife or a thin frosting spatula to even them out, this is your one chance to do this. However, be very careful if you touch them in any way before baking.
Obviously, you will need 24 individual cookie halves to yield a batch of 12 finished macarons. The yield actually depends on what the size you pipe the cookies. I feel that cookies with a two inch diameter bake to become an easy size to work with.
One trick to eliminating any bubbles in the batter, and to even out the tops of the batter, is to raise the baking pan upward six inches, and drop it squarely and flatly onto your kitchen counter or table. You can repeat this process up to three times. You will see any large bubbles pop on the surface of the cookies, and the tops will now be flatter and smoother.
Although it seems extreme (and slightly boring), you must now let the raw cookies to sit for (at least) a full 30 minutes, or until the tops of the cookies can be gently touched without your fingers sticking. If you are doing more than one batch or flavor, use this time to clean up the mixing bowls, and prepare to get the next batch ready.
NOTE: Adjust your oven rack to the middle-to-upper third of the oven so that the bottoms don’t burn.
Preheat the oven to 300 degrees Fahrenheit, insert the cookies and bake for 20 minutes. If at any point you want to peek into the oven to observe baking progress, you can do so, but do not slam the oven door shut. As you approach 20 minutes of oven time you should see the rounded tops of the cookies successfully breaking away from the base of the cookie, forming the trademark upward neck of stretch lines as they rise. Make sure they get the full 20 minutes in the oven, or the middles could be damp and stick to the parchment paper.
Remove the cookies from the oven, and let them cool. If you have multiple pans, you can now place the next prepared pan in the oven while “batch one” cools off. Once the baked cookies have cooled, the cookie tops and bottoms should easily peel away from the parchment paper. Place the individual cookie halves on a plate or a piece of wax paper.
Now it is time to apply the centers to the flat side of the cookies you determine to be the bottoms, and assemble them into finished Macarons. Since these are handmade cookies, there will undoubtedly be some size variations. Now is the perfect time to match up the most identically sized halves. If you are going to display these on a serving plate, you will probably want the cookies with the flattest bottoms to be the bottom of this sandwich cookie. Also, you will probably want to designate your most attractive and perfectly formed halves as the ones that are displayed as the tops.
For preserve-filled cookies, like the Orange and Blueberry, remove one half a cup of preserve from the jar, place in a bowl, and stir it up. It will spread more easily this way. For the passion fruit, place one half cup of apricot preserves in a bowl, and mix in 1/4 to 1/2 a teaspoon of Passion Fruit extract. For the Key Lime Macaron filling, place one half cup of lime curd in a bowl, add a drop or two of green food coloring, and mix (lime marmalade will also work great as a filling in this macaron). For the Watermelon Lemonade Macaron filling, take one half cup of lemon curd, and stir it in a bowl. Approximately one teaspoon of preserve or curd should do the trick per cookie. Spread it onto the bottom of one of the cookie halves with a butter knife or frosting spatula, and affix an equal sized top cookie on it. If you give it a clockwise or counter-clockwise twist, the cookie tops and bottoms will lock onto each other. When you are finished, they should resemble colorful little “hamburgers.”
Repeat the process until all of the cookies are complete. Now, that was easy wasn’t it? Even if your cookies don’t come out perfect looking the first time around, they are none-the-less delicious, and will be the hit of any dessert table at which you serve them. This is one of those recipes where it may take you a couple of batches to get it right, but it is so worth it!
In case you really want to go wild: here are some more suggested flavors: Lavender Macarons (lavender extract, purple food coloring, fill with cream cheese frosting), Chocolate Mint Macarons (green food coloring, mint flavoring, chocolate spread centers), Cherry Macarons (red food coloring, cherry flavoring, cherry preserve filling), Raspberry / Blackberry Macarons (deep purple food coloring, raspberry flavoring, blackberry preserve filling), Pineapple Macarons (yellow food coloring, pineapple flavoring, pineapple preserve filling), and Licorice Macarons (black food coloring, anise or licorice flavoring, anise or licorice flavored black or white cream cheese frosting).
NOTE: for Cream Cheese Frosting: with a hand or stationary electric mixer, blend together 8 oz. Cream Cheese (room temperature), 1/2 cup (one stick) Butter (room temperature), 1 pound of Powdered (confectioners) Sugar. Mix until thick and creamy. Flavor with six teaspoons pure vanilla extract for intense vanilla frosting. Other flavors and colors are up to you.
I realize that these are time-consuming cookies to make, however, when you stand back and look at the finished product, you will be amazed. If you are looking for a dramatic dessert that will amaze your family and friends, this is it!